异度部落格

学习是一种生活态度。

0%

JVM 运行时数据区域示意图如下所示:

image

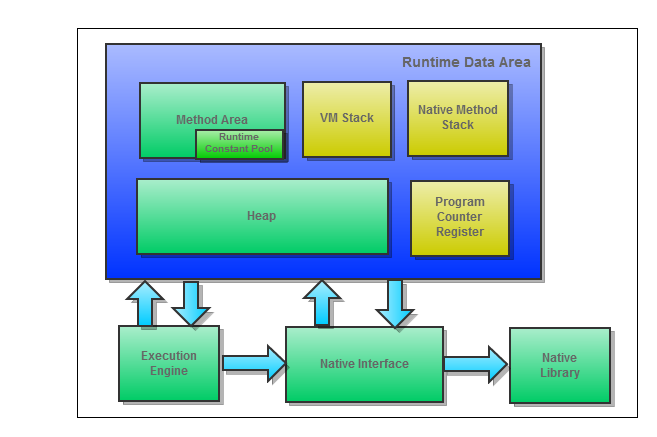
共享数据区域:Method Area、Heap
私有数据区域:VM Stack、Native Method Stack、Program Counter Register

1)方法区(Method Area)
    用于存储已被虚拟机加载的 class 信息、常量、静态变量、即时编译后的代码等数据。
    Exception:OutOfMemoryError

2)Java 虚拟机栈(JVM Stack)
    每个方法被执行时都会创建一个 Stack Frame 用于存储局部变量表、操作栈、动态链接、方法出口等信息。每个方法被调用直至执行完成,就对应着一个 Stack Frame 在虚拟机栈中从入栈到出栈的过程。
    Exception:StackOverflowError、OutOfMemoryError

3)本地方法区(Native Method)
    为使用 Native 方法服务的。
    Exception:StackOverflowError、OutOfMemoryError

4)Java 堆(Java Heap)
    JVM 中最大的一块区域。Java Heap 是被所有线程所共享,在 JVM 启动时创建。
    在 JVM 规范中的描述如下:The heap is the runtime data area from which memory for all class instances and arrays is allocated.

5)程序计数器(Program Counter Register)
    用于指示当前线程所执行的字节码行号指示器。
    Exception:None

6)运行时常量池(Runtime Constant Pool)
    是方法区的一部分。用于存放编译时生成的各种字面变量和常用符号
    Exception:OutOfMemoryError

public class EchoDefaultSystemEncoding
{
public static void main(String[] args)
{
String encoding = System.getProperty("file.encoding");
System.out.println("Default System Encoding:" + encoding);
}
}

OS: Ubunut 12.04

Hadoop: 1.0.4

JDK: OpenJDK 1.6

1.修改 hadoop/src/contrib/build-contrib.xml

下面添加

<property name=”eclipse.home” location=”#{你的eclipse安装目录}” />
<property name=”version” value=”1.0.4″/>

2.修改 hadoop/src/contrib/eclipse-plugin/build.xml

1)添加

<path id=”hadoop-jars”>
<fileset dir=”${hadoop.root}/”>
<include name=”hadoop-*.jar”/>
</fileset>
</path>

2)在添加

<path id=”classpath”>
<pathelement location=”${build.classes}”/>
<pathelement location=”${hadoop.root}/build/classes”/>
<!– hadoop-core-1.0.4.jar dependency –>
<pathelement location=”${hadoop.root}”/>
<!– common lib dependency –>
<pathelement location=”${hadoop.root}/lib”/>
<path refid=”eclipse-sdk-jars”/>
<path refid=”hadoop-jars”/>
</path>

3)在添加

<target name=”jar” depends=”compile” unless=”skip.contrib”>
<mkdir dir=”${build.dir}/lib”/>
<!– 将以下jar包打进hadoop-eclipse-1.0.4.jar中 –>
<copy file=”${hadoop.root}/hadoop-core-1.0.4.jar” tofile=”${build.dir}/lib/hadoop-core.jar” verbose=”true”/>
<copy file=”${hadoop.root}/lib/commons-cli-1.2.jar” todir=”${build.dir}/lib” verbose=”true”/>
<copy file=”${hadoop.root}/lib/commons-lang-2.4.jar” todir=”${build.dir}/lib” verbose=”true”/>
<copy file=”${hadoop.root}/lib/commons-configuration-1.6.jar” todir=”${build.dir}/lib” verbose=”true”/>
<copy file=”${hadoop.root}/lib/jackson-mapper-asl-1.8.8.jar” todir=”${build.dir}/lib” verbose=”true”/>
<copy file=”${hadoop.root}/lib/jackson-core-asl-1.8.8.jar” todir=”${build.dir}/lib” verbose=”true”/>
<copy file=”${hadoop.root}/lib/commons-httpclient-3.0.1.jar” todir=”${build.dir}/lib” verbose=”true”/>
<jar
jarfile=”${build.dir}/hadoop-${name}-${version}.jar”
manifest=”${root}/META-INF/MANIFEST.MF”>
<fileset dir=”${build.dir}” includes=”classes/ lib/”/>
<fileset dir=”${root}” includes=”resources/ plugin.xml”/>
</jar>
</target>

3.将 hadoop-core-1.0.4.jar 复制到 hadoop/build 目录下

4.将 hadoop/lib/commons-cli-1.2.jar 复制到 hadoop/build/ivy/lib/Hadoop/common(没有请自行创建)目录下

5.进入 hadoop/src/contrib 目录,执行 ant jar

6.将 hadoop/build/contrib/eclipse-plugin/hadoop-eclipse-plugin-1.0.4.jar 复制到 eclipse/plugins 目录下

参考资料:

http://tianwenbo.iteye.com/blog/1464242 http://blog.csdn.net/yundixiaoduo/article/details/7451753 http://hi.baidu.com/geogrex/item/4e5853ce8fd4e01f0ad93a9f#0

OS: Ubuntu 12.04   Hadoop: Hadoop 1.0.4

1.安装集群所需软件

sudo apt-get install install ssh
sudo apt-get install rsync

配置ssh免密码登录

ssh-keygen -t dsa -P '' -f ~/.ssh/id_dsa
cat ~/.ssh/id_dsa.pub >>~/.ssh/authorized_keys

验证是否成功

ssh localhost

2.安装JDK

安装部分就不重复了,主要说明下环境变量的添加

sudo vi /etc/profile

将下面三句话添加到最后

export JAVA_HOME=/usr/lib/jvm/java-6-openjdk
export PATH=$JAVA_HOME/bin:$PATH
export CLASSPATH=.:$JAVA_HOME/lib/dt.jar:$JAVA_HOME/lib/tools.jar

3.安装Hadoop

下载地址:http://apache.etoak.com/hadoop/common/ 建议选择:1.0.x版本的tar文件,不建议使用deb或者rpm的包,因为后面回带来很复杂的程序权限问题。 修改配置文件,指定JDk安装路径

vi conf/hadoop-env.sh
export JAVA_HOME=/usr/lib/jvm/java-6-openjdk

修改Hadoop核心配置文件core-site.xml,这里配置的是HDFS的地址和端口号

vi conf/core-site.xml
<pre class="brush: xml; gutter: true; first-line: 1"><configuration>
<property>
<name>fs.default.name</name>
<value>hdfs://localhost:9000</value>
</property>
<property>
<name>hadoop.tmp.dir</name>
<value>/home/killua/Application/tmp/hadoop-${user.name}</value>
</property>
</configuration>

修改Hadoop中HDFS的配置,配置的备份方式默认为3,因为安装的是单机版,所以需要改为1 vi conf/hdfs-site.xml

<configuration>
<property>
<name>dfs.replication</name>
<value>1</value>
</property>
</configuration>

修改Hadoop中MapReduce的配置文件,配置的是JobTracker的地址和端口

vi conf/mapred-site.xml
<configuration>
<property>
<name>mapred.job.tracker</name>
<value>localhost:9001</value>
</property>
</configuration>

启动Hadoop,在启动之前,需要格式化Hadoop的文件系统HDFS

bin/hadoop namenode -format
然后启动Hadoop所有服务,输入命令

bin/start-all.sh

**4.验证是否安装成功**
打开浏览器,分别输入一下网址:
http://localhost:50030 (MapReduce的Web页面)
http://localhost:50070 (HDfS的web页面)

ICTCLAS(Institute of Computing Technology,Chinese Lexical Analysis System),由中国科学院计算技术研究开发,功能包括中文分词;词性标注;命名实体识别;新词识别;同时支持用户词典;支持繁体中文;支持 gb2312、GBK、UTF8 等多种编码格式,是世界上最好的汉语词法分析器之一。 下载地址:http://ictclas.org/ictclas_download.aspx

原系统只提供了 C++和 Java 版本,为了方便广大 Pythoner,决定用 python 对其进行重新封装。目前仅支持 Linux,Windows 版本开发中。 pyictclas 模块中包含三个类:一个 PyICTCLAS 类,用于分词工具的调用;一个是 CodeType?类,用于存放各种编码的枚举类型;一个是 POSMap 类用于存放标注集枚举类型。

项目主页:http://code.google.com/p/python-ictclas/

该项目废除,新项目参考:http://www.yidooo.net/archives/nlpir-python-version.html

【试题描述】写一个函数,求两个整数的和,要求在函数体内不得使用加减乘除四则运算符合。

【试题来源】未知

【参考代码】

int add(int num1, int num2) {

int sum;
int carry;
do {
sum = num1 ^ num2;
carry = (num1 & num2) << 1;

num1 = sum;
num2 = carry;
} while(num2 != 0);

return num1;
}

【试题描述】我们把只包含因子2、3和5的数称作丑数。求按从到大的顺序的第1500个丑数。例如6,8是丑数,而14不是,因为它包含因子7.习惯上把1当作第一个丑数。

【试题来源】未知

【参考代码】

int Min(int a, int b, int c) {

return (a < b ? a : b) < c ? (a < b ? a : b) : c;
}

int uglyNumber(int n) {

if(n <= 0) {
throw ("Invalid Input.");
}

long* uglyNum = new long[n];
uglyNum[0] = 1;

int index2 = 0;
int index3 = 0;
int index5 = 0;
int indexLast = 0;

while(indexLast < n) {
int min = Min(uglyNum[index2] * 2, uglyNum[index3] * 3, uglyNum[index5] * 5);
uglyNum[++indexLast] = min;

while(uglyNum[index2] * 2 <= uglyNum[indexLast]) {
index2++;
}

while(uglyNum[index3] * 3 <= uglyNum[indexLast]) {
index3++;
}

while(uglyNum[index5] * 5 <= uglyNum[indexLast]) {
index5++;
}
}

return uglyNum[n - 1];

}

【试题描述】输入一个二叉树和一个整数,打印出二叉树中节点值的和为输入整数的所有路径。从树的根节点开始往下一直到叶节点所经过的节点形成的一条路径。

【试题来源】未知

【参考代码】

void findPath(BinaryTreeNode* rootNode, int expectSum,
vector<int>& path, int curSum) {

if(rootNode == NULL) {
return ;
}

path.push_back(rootNode->value);
curSum += rootNode->value;

if(rootNode->left == NULL && rootNode->right == NULL
&& curSum == expectSum) {
cout << "Find a path: ";
for(vector<int>::iterator iter = path.begin(); iter != path.end(); iter++) {
cout << *iter << " ";
}
cout << endl;
}

if(rootNode->left != NULL) {
findPath(rootNode->left, expectSum, path, curSum);
}

if(rootNode->right != NULL) {
findPath(rootNode->right, expectSum, path, curSum);
}

path.pop_back();
curSum -= rootNode->value;
}

void findPaths(BinaryTreeNode* rootNode, int expectSum) {

vector<int> path;
findPath(rootNode, expectSum, path, 0);
}

【试题描述】输入一棵二叉树的根结点,求该树的深度。从根结点到叶子结点依次经过的结点(含根、叶子节点)形成树的一条路径,最长路径的长度为树的深度。

【试题来源】未知

【参考代码】

int treeDepth(BinaryTreeNode* rootNode) {

if(rootNode == NULL) {
return 0;
}

int leftSubTreeDepth = treeDepth(rootNode->left);
int rightSubTreeDepth = treeDepth(rootNode->right);

return leftSubTreeDepth > rightSubTreeDepth ? (leftSubTreeDepth + 1) : (rightSubTreeDepth + 1);
}

【试题描述】输入一个字符串,打印出该字符串中字符的所有排列。例如输入字符串abc,则打印出a,b,c所能排列出来的所有字符串abc,acb,bac,bca,cab,cba。

【试题来源】未知

【参考代码】

#include <iostream>
#include <cstring>
#include<cstdio>
#include<cstdlib>
using namespace std;

void permutation(char* str, int begin) {

if(begin == strlen(str)) {
cout << str << endl;
} else {
for(int i = begin; i < strlen(str); ++i) {
char tmp = str[i];
str[i] = str[begin];
str[begin] = tmp;

permutation(str, begin + 1);

tmp = str[i];
str[i] = str[begin];
str[begin] = tmp;
}
}
}

void permutation(char* str) {
if(str == NULL) {
return ;
}

permutation(str, 0);
}

int main() {
char str[] = "abc";
//char* str = "abc"; //Runtime Error
permutation(const_cast<char*>(str));
return 0;
}