最简单的方式就是在 build.xml 里面加入下面代码:
<setproxy proxyhost="proxy_host" proxyport="proxy_port"/> |
更多细节可以参考:
Proxy Configuration:https://ant.apache.org/manual/proxy.html
Setproxy Task:https://ant.apache.org/manual/Tasks/setproxy.html
最简单的方式就是在 build.xml 里面加入下面代码:
<setproxy proxyhost="proxy_host" proxyport="proxy_port"/> |
更多细节可以参考:
Proxy Configuration:https://ant.apache.org/manual/proxy.html
Setproxy Task:https://ant.apache.org/manual/Tasks/setproxy.html
最近在Linux使用GoAgent+SwitchySharp下,Github无法加载CSS。

在Chrome中按下F12进行调试,重新加载页面显示如下:

由此可见,CSS无法加载的原因就在于,GoAgent无法连接到github.global.ssl.fastly.net。因此解决方法只要将github.global.ssl.fastly.net加入SwitchySharp的rule就可以了,使其Direct Connection。

SkipList(跳跃表)是一种随机化数据结构,基于并联的链表,实现简单,插入、删除、查找的复杂度均为O(logN)。
SkipList 是对有序的链表增加上附加的前进链接,增加是以随机化的方式进行的,所以在列表中的查找可以快速的跳过部分列表,因此得名。所有操作都以对数随机化的时间进行。
此外,SkipList 在当前热门的开源项目中也有很多应用,比如 LevelDB 的核心数据结构 memtable 以及 redis 的 sorted set。在 JDK 中,ConcurrentSkipListMap 的核心数据结构也是利用 SkipList 实现的。
先看一下普通的有序单链表: 
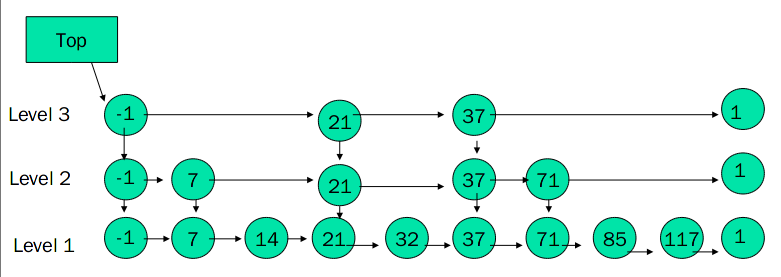
要在里面查找一个值就需要顺序比较,如何降低复杂度,折半查找也却可以将复杂度降到 O(log N),但不适应单链表,那就将折半的思想抽出来,隔一段位置就建立一个标签索引,根据标签索引缩短查找范围,就是 SkipList,如下图:
 SkipList
通过对间隔的数据做一个标签索引,产生了多层单链表,在最高层依次确定查找数据的范围,最终将范围缩小到可接受值,我们看
SkipList
其实就是一个二叉查找树的变形,只是所有的数据都在最左段,其他节点用来建立查找索引,如此
SkipList 的插入删除就比二叉查找树方便多了。
SkipList
通过对间隔的数据做一个标签索引,产生了多层单链表,在最高层依次确定查找数据的范围,最终将范围缩小到可接受值,我们看
SkipList
其实就是一个二叉查找树的变形,只是所有的数据都在最左段,其他节点用来建立查找索引,如此
SkipList 的插入删除就比二叉查找树方便多了。
一个 SkipList,应该具有以下特征:
例如:查找元素 117

先确定该元素要占据的层数 K(采用随机的方式),然后在 Level1 … LevelK 各个层的链表都插入元素。
例如:插入 119, K = 2  如果 K
大于链表的层数,则要添加新的层。
例如:插入 119, K = 4 
在各个层中找到包含 x 的节点,使用标准的 delete from list 方法删除该节点。
例如:删除 71 

http://blog.csdn.net/daniel_ustc/article/details/20218489 http://dsqiu.iteye.com/blog/1705530 http://in.sdo.com/?p=711
OS: Ubuntu 12.04 LTS
Kernel Version: 3.8.0-33-generic
Hadoop: 2.2.0
官方的 BUILDING.txt 给出的安装需求

sudo apt-get install openjdk-7-jdk |
sudo apt-get install maven |
Download: http://findbugs.sourceforge.net/
设置环境变量
vi .bashrc |
Download: https://code.google.com/p/protobuf/
在安装 protocolbuffer 之前需要先安装 g++
sudo apt-get install g++ |
安装 protocolbuffer
cd protobuf-2.5.0 |
sudo apt-get install cmake |
mvn package -Pdist -DskipTests -Dtar |
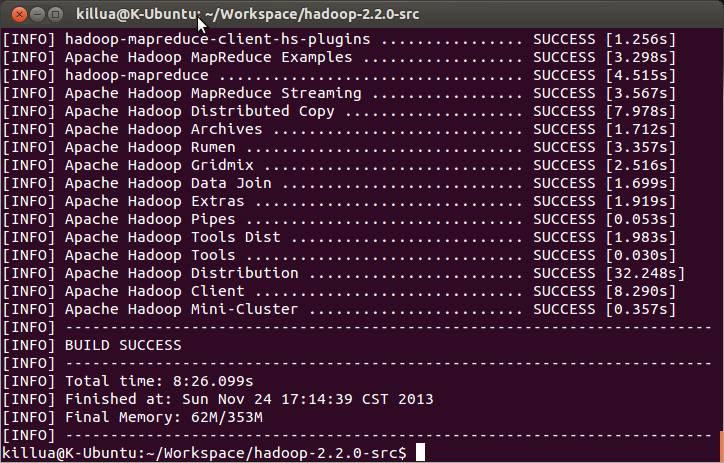
编译后的结果可以在 hadoop-2.2.0-src/hadoop-dist/target/hadoop-2.2.0 中看到

1) error: cannot access AbstractLifeCycle
在编译的过程中出现/home/killua/Workspace/hadoop-2.2.0-src/hadoop-common-project/hadoop-auth/src/test/java/org/apache/hadoop/security/authentication/client/AuthenticatorTestCase.java:[88,11] error: cannot access AbstractLifeCycle 错误
经过查证发现是 hadoop2.2.0 的一个 bug,具体参见https://issues.apache.org/jira/browse/HADOOP-10110
解决方法:
修改 hadoop-2.2.0-src/hadoop-common-project/hadoop-auth/pom.xml,将
<dependency> |
修为
<dependency> |
在 Ubuntu 中,启动 IntelliJ IDEA 时出错,错误如下:

解决方法:
修改 idea.sh 文件,添加一行在开头
JAVA_HOME=/home/killua/Dev/jdk1.7.0_45 |
Hadoop NameNode 管理着文件系统的 Namespace,它维护着整个文件系统树(FileSystem Tree)以及文件树中所有的文件和文件夹元数据(Metadata)。
Namenode Metadata 主要是两个文件:edits 和 fsimage。fsimage 是 HDFS 的最新状态(截止到 fsimage 文件创建时间的最新状态)文件,而 edits 是自 fsimage 创建后的 namespace 操作日志。Namenode 每次启动的时候,都要合并两个文件,按照 edits 的记录,把 fsimage 文件更新到最新。
Hadoop SecondaryNameNode 并不是 Hadoop 第二个 NameNode,它不提供 NameNode 服务,而仅仅是 NameNode 的一个工具,帮助 NameNode 管理 Metadata 数据。
一般情况下,当 NameNode 重启的时候,会合并硬盘上的 fsimage 文件和 edits 文件,得到完整的 Metadata 信息。但是,如果集群规模十分庞大,操作频繁,那么 edits 文件就会非常大,这个合并过程就会非常慢,导致 HDFS 长时间无法启动。如果定时将 edits 文件合并到 fsimage,那么重启 NameNode 就可以非常快,而 SecondaryNameNode 就做这个合并的工作。
SecondaryNamenode 定期地从 Namenode 上获取元数据。当它准备获取元数据的时候,就通知 Namenode 暂停写入 edits 文件。Namenode 收到请求后停止写入 edits 文件,之后的 log 记录写入一个名为 edits.new 的文件。Secondary Namenode 获取到元数据以后,把 edits 文件和 fsimage 文件在本机进行合并,创建出一个新的 fsimage 文件,然后把新的 fsimage 文件发送回 Namenode。Namenode 收到 Secondary Namenode 发回的 fsimage 后,就拿它覆盖掉原来的 fsimage 文件,并删除 edits 文件,把 edits.new 重命名为 edits。
通过这样一番操作,就避免了 Namenode 的 edits 日志的无限增长,加速
Namenode 的启动过程。 
可能是由于 Secondary NameNode 容易对人产生误导,因此 Hadoop 1.0.4 之后建议不要使用 Secondary NameNode,而使用 CheckPoint Node。Checkpoint Node 和 Secondary NameNode 的作用以及配置完全相同,只是启动命令不同 bin/hdfs namenode -checkpoint
Backup Node 在内存中维护了一份从 Namenode 同步过来的 fsimage,同时它还从 namenode 接收 edits 文件的日志流,并把它们持久化硬盘,Backup Node 把收到的这些 edits 文件和内存中的 fsimage 文件进行合并,创建一份元数据备份。虽然 BackupNode 是一个备份的 NameNode 节点,不过 Backup Node 目前还无法直接接替 NameNode 提供服务。因此当前版本的 Backup Node 还不具有热备功能,也就是说,当 NameNode 发生故障,目前还只能通过重启 NameNode 的方式来恢复服务。
不过在 Hadoop 2.x 中提出了 Hadoop HA 的一些策略,实现了 Hadoop NameNode 的 failover。
一致性 Hash 算法(Consistent hashing)早在 1997 年就在论文 Consistent hashing and random trees 中被提出,目前在 cache 系统中应用越来越广泛。
假设有 N 个 cache 服务器,那么如何将一个对象 object 映射到 N 个 cache 服务器上呢,你很可能会采用类似下面的通用方法计算 object 的 hash 值,然后均匀的映射到到 N 个 cache:
hash(object)%N |
考虑如下的两种情况;
1)假设一个 cache 服务器 m 挂掉了,这样所有映射到 cache m
的对象都会失效。这时需要把 cache 服务器 m 从系统中移除,cache
服务器数变成 N-1 台,因此映射公式变成:
hash(object)%(N-1) |
2)如果需要添加 cache 服务器 ,cache 服务器数变成 N+1 台,映射公式变成:
hash(object)%(N+1) |
这两种情况的出现,使得原来的 cache 都失效了。可见上述的 Hash 算法并不能很好的适应 cache 系统,因此为了解决这两种情况我们引入一致性 Hash。
算法具体步骤如下:
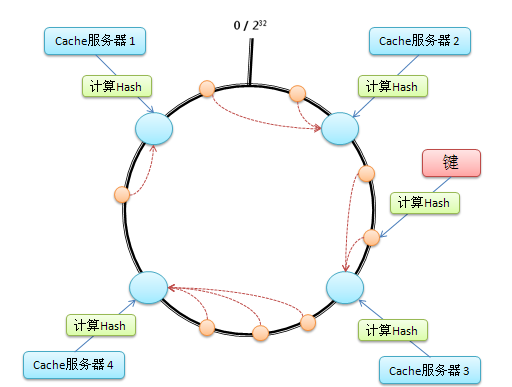
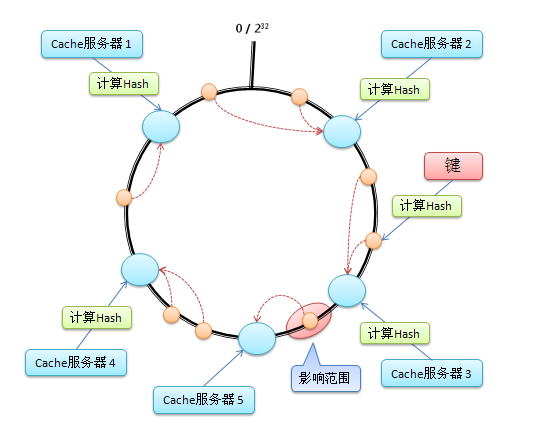
假设在这个环形哈希空间中,cache5 被映射在 Cache3 和 Cache4 之间,那么受影响的将仅是沿 Cache5 逆时针遍历直到下一个 Cache(Cache3)之间的对象(它们本来映射到 Cache4 上)。
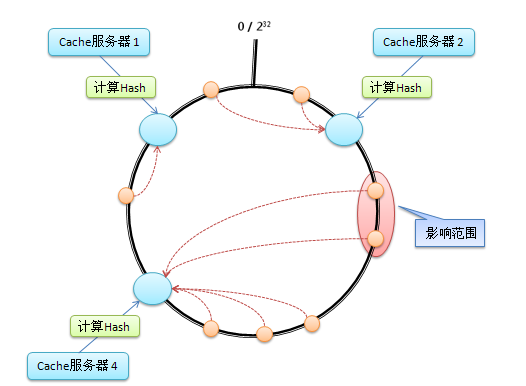
假设在这个环形哈希空间中,Cache3 被移除,那么受影响的将仅是沿 Cache3 逆时针遍历直到下一个 Cache(Cache2)之间的对象(它们本来映射到 Cache3 上)。
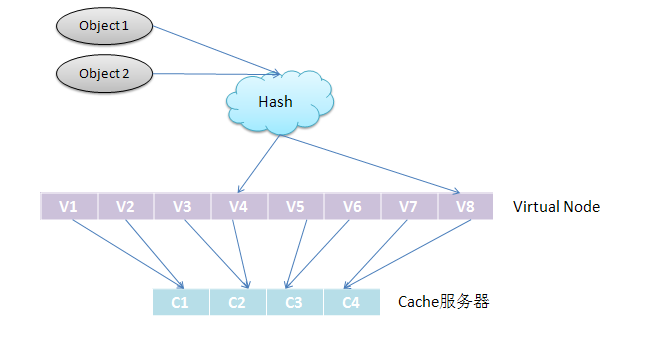
考虑到哈希算法并不是保证绝对的平衡,尤其 Cache 较少的话,对象并不能被均匀的映射到 Cache 上。为了解决这种情况,一致性 Hash 引入了“虚拟节点”的概念: 一个实际节点对虚拟成若干个“虚拟节点”,这个对应个数也成为“复制个数”,“虚拟节点”在哈希空间中以哈希值排列。仍以 4 台 Cache 服务器为例,在下图中看到,引入虚拟节点,并设置“复制个数”为 2 后,共有 8 个“虚拟节点”分部在环形区域上,缓解了映射不均的情况。
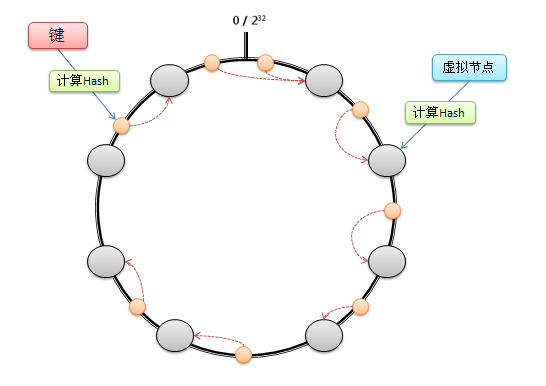
引入了“虚拟节点”后,映射关系就从【对象--->Cache 服务器】转换成了【对象--->虚拟节点---> Cache 服务器】。查询对象所在 Cache 服务器的映射关系如下图所示。
一致性 hash 算法 - consistent hashing: http://blog.csdn.net/sparkliang/article/details/5279393
一致性哈希算法(Consistent Hashing): http://blog.csdn.net/x15594/article/details/6270242
一致性 hash 和 solr 千万级数据分布式搜索引擎中的应用: http://blog.jobbole.com/47023/"http://blog.jobbole.com/47023/>
在安装 Hive 之前,请保证已经安装了 Hadoop。Hadoop 安装参考:Hadoop 2.2.0 安装及配置
本文选用 mysql 作为 Hive 的 metastore。
sudo yum install mysql-server |
mysql> create database hive; |
##修改数据库操作权限
mysql> grant all on hive.* to hive@'%' identified by 'hive'; |
tar zcvf hive-0.12.0.tar.gz hive-0.12.0 |
cd conf |
<property> |
# Set HADOOP_HOME to point to a specific hadoop install directory |
下载页面:http://www.mysql.com/downloads/connector/j/5.1.html
cp mysql-connector-java-5.1.26-bin.jar to hive/lib |
hive> create table test (key string); |
hive> create table test (key string); |
错误:ERROR 2002 (HY000): Can't connect to local MySQL server
through socket '/var/lib/mysql/mysql.sock' (2)
解决方法:sudo service mysqld start
错误:ERROR 1044 (42000): Access denied for user
''@'localhost' to database 'hive'
解决方法:
[hadoop@zhenlong-master ~]$ mysql -h localhost -u root -p Enter
password:
错误:FAILED: Execution Error, return code 1 from
org.apache.hadoop.hive.ql.exec.DDLTask. java.lang.RuntimeException:
Unable to instantiate
org.apache.hadoop.hive.metastore.HiveMetaStoreClient
这个错误的原因很多,因此需要进行调试。 启动 hive 带上调试参数,./hive
-hiveconf
hive.root.logger=DEBUG,console,从调试信息中可以获得错误详细信息。
如果错误信息为: Caused by: org.datanucleus.exceptions.NucleusException:
Attempt to invoke the "BoneCP" plugin to create a ConnectionPool gave an
error : The specified datastore driver ("com.mysql.jdbc.Driver") was not
found in the CLASSPATH. Please check your CLASSPATH specification, and
the name of the driver.
解决方法:将 mysql 的 jdbc driver 拷贝到 hive/lib 即可。
如果错误信息为:
Caused by: MetaException(message:Version information not found in
metastore. )
解决方法:set hive.metastore.schema.verification = false
<property> |
Bloom Filter(中文译作:布隆过滤器)是 1970 年由 Bloom 提出的。它实际上是由一个很长的二进制位数组和一系列 Hash 函数组成。
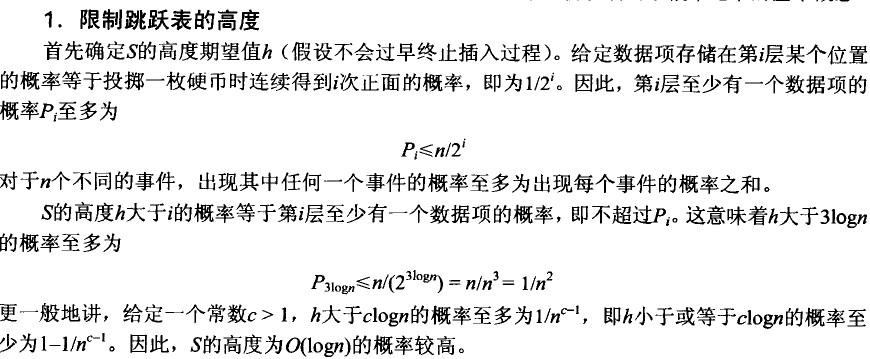
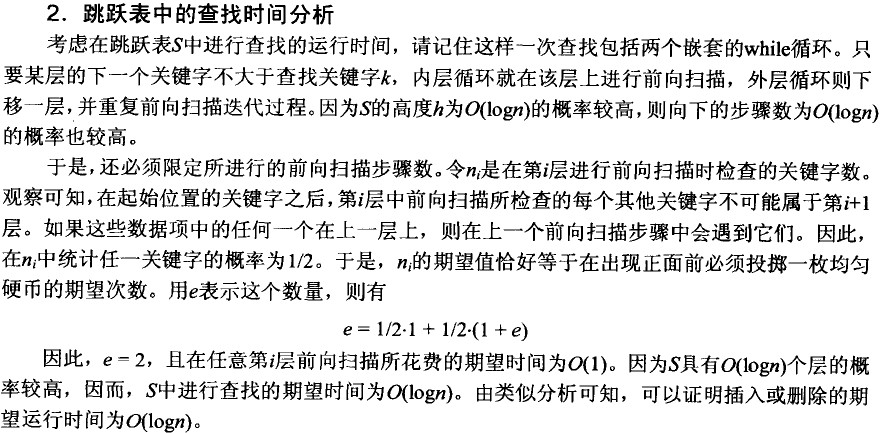
Bloom Filter 是一种空间效率很高的随机数据结构,它利用位数组很简洁地表示一个集合,并能判断一个元素是否属于这个集合。Bloom Filter 的这种高效是有一定代价的:在判断一个元素是否属于某个集合时,有可能会把不属于这个集合的元素误认为属于这个集合(false positive)。因此,Bloom Filter 不适合那些“零错误”的应用场合。而在能容忍低错误率的应用场合下,Bloom Filter 通过极少的错误换取了存储空间的极大节省。
创建一个 m 位 BitSet,先将所有位初始化为 0,然后选择 k 个独立的哈希函数。第 i 个哈希函数对字符串 str 哈希的结果记为 hash,,i,,(str),且 i 的范围是 0 到 m-1 。有关 Bloom Filter 的操作的过程可以参考http://billmill.org/bloomfilter-tutorial/
对于字符串 str,分别计算 hash,,1,,(str),hash,,2,,(str)…… hash,,k,,(str)。然后将 BitSet 的第 hash,,1,,(str),hash,,2,,(str)…… hash,,k,,(str)位设为 1。就此,就完成了将字符串 str 映射到 BitSet 中的 k 个二进制位。
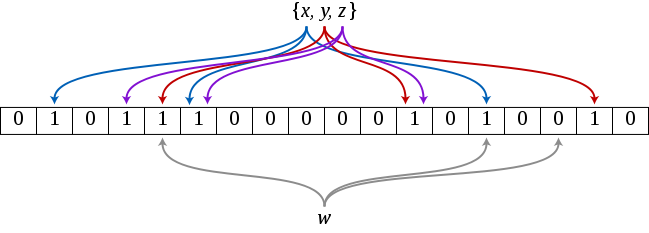
下面是检索字符串 str 是否在 BitSet 中:
对于字符串 str,分别计算 hash,,1,,(str),hash,,2,,(str)…… hash,,k,,(str)。然后检查 BitSet 的第 hash,,1,,(str),hash,,2,,(str)…… hash,,k,,(str)位是否全为 1。
若一个字符串对应的 bit 位不全为 1,则可以肯定该字符串一定没有被 Bloom Filter 记录过。
但是若一个字符串对应的 Bit 全为 1,实际上是不能 100%的肯定该字符串被 Bloom Filter 记录过的。因为有可能该字符串的所有位都刚好是被其他字符串所对应,这种将该字符串划分错的情况,称为 false positive 。
在基本的 Bloom Filter 中,字符串加入了就被不能删除了,因为删除会影响到其他字符串。实在需要删除字符串的可以使用Counting Bloom Filter(CBF),这是一种基本 Bloom Filter 的改进,CBF 将基本 Bloom Filter 每一个 Bit 改为一个计数器,这样就可以实现删除字符串的功能了。
hash 函数的选择对性能影响比较大,一个优秀的 hash 函数应该做到将字符串等概率的映射到各个 bit。与此同时,选择 k 个不同的 hash 比较繁琐,一种简单的策略就是采用同一个 hash 函数然后传入 k 不同的参数。下面列举的是一些软件框架中 BloomFilter 所使用的 hash 函数。
哈希函数个数 k、位数组大小 m、加入的字符串数量 n 的关系可以参考http://pages.cs.wisc.edu/~cao/papers/summary-cache/node8.html。该文献证明了对于给定的 m、n,当

时出错的概率是最小的。
同时参考文献中也给出了 false positive 概率与 m、n 的关系。false postive 概率等于

完整的参数关系推导请参考http://pages.cs.wisc.edu/~cao/papers/summary-cache/node8.html
Bloom Filter 跟 HashMap 不同之处在于:Bloom Filter 使用了 k 个哈希函数,每个字符串跟 k 个 bit 对应,从而降低了冲突的概率。
GitHub: https://github.com/zhenlohuang/BloomFilter"https://github.com/zhenlohuang/BloomFilter>
布隆过滤器: http://zh.wikipedia.org/wiki/%E5%B8%83%E9%9A%86%E8%BF%87%E6%BB%A4%E5%99%A8"
BloomFilter——大规模数据处理利器: http://www.cnblogs.com/heaad/archive/2011/01/02/1924195.html
Bloom Filter 概念和原理: http://blog.csdn.net/jiaomeng/article/details/1495500
保证所有主机上已经安装 JDK 1.6+和 ssh。
修改/etc/hosts
sudo vi /etc/hosts |
添加
192.168.56.101 zhenlong-master |
在所有主机上生成 ssh 的公钥和私钥
ssh-keygen -t rsa |
在 master 主机上,生成 authorized_keys
cp ~/.ssh/id_rsa.pub ~/.ssh/authorized_keys |
,并 copy 到所有 slaves 的~/.ssh/目录。
Apache Hadoop: http://www.apache.org/dyn/closer.cgi/hadoop/common/
保证 master 和 slaves 上面的 hadoop 解压的相同的目录
export HADOOP_HOME=/home/hadoop/hadoop-2.2.0 |
修改 conf 文件夹下面的几个文件:
<configuration> |
<configuration> |
<configuration> |
<configuration> |
zhenlong-slave1 |
export JAVA_HOME=/home/hadoop/jdk1.6.0_45 |
此处 JAVA_HOME 可以根据每天 Server 情况设定。
第一次启动,需要先格式化 NameNode。
hadoop namenode -format |
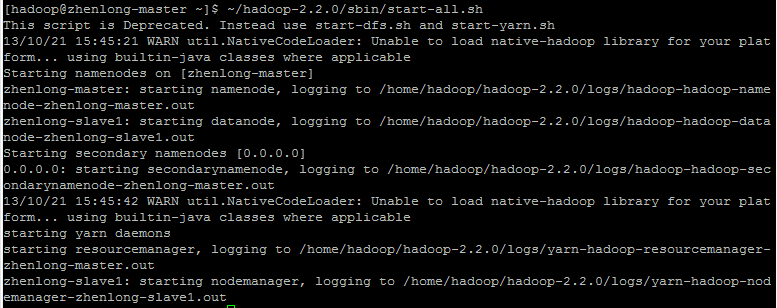
~/hadoop-2.2.0/sbin/start-all.sh |


HDFS Web UI: http://zhenlong-master:50070
YARN Web UI: http://zhenlong-master:8088
YARN && MapReduce 测试:
~/hadoop-2.2.0/bin/hadoop jar ~/hadoop-2.2.0/share/hadoop/mapreduce/hadoop-mapreduce-examples-2.2.0.jar wordcount file wordcount_out |
